We propose to create a medium-resolution electronic USB microscope at home for connecting to a computer via a USB cable. You may already have the parts needed to complete this project, otherwise you will have to buy them.


Necessary parts for assembling a homemade microscope with your own hands:
- One white LED.
- Wire with a cross section of 0.05 mm2.
- Heat shrink tubing or insulating tape.
- Glue gun (or any other suitable glue).
Step 1: Modify the device


The pocket microscope has a built-in incandescent lamp for illumination, which is powered by two AAA 1.5 V batteries. Remove the lamp and batteries from the housing and install one white LED, extending the wires from it inside the housing to the top of the microscope.
Use heat shrink tubing or electrical tape to insulate the contacts.
Check the operation of the LED using a battery and mark which wire is the anode and which the cathode.
There is a small but damn bright orange LED on the camera board. Carefully remove it and solder the wires from the white LED in its place. The LED is under software control, USB will provide power to the camera and LED. Make sure there is no tension on the wires.
Use hot melt glue to glue the white LED inside the housing. Position the LED so that it illuminates the area where the lens is pointed.
Step 2: Remove the plastic housing from the camera

You don't have to remove the case, but it's better to remove it anyway.
Under the shiny logo on the case there is a single fixing screw.
Step 3: We assemble


Assemble the body.
Remove the small rubber ring from the eyepiece and insert the camera into the eyepiece.
Apply a little glue around the junction of the camera lens and the microscope eyepiece.
Step 4: Making the Base


The finished USB microscope is quite light, so it needs to be mounted in a vertical position. Glue a couple of neodymium magnets to the bottom of the microscope. Then make a wooden base with a small metal plate glued to it.
The idea is that a microscope, magnetized to a metal plate, can slide freely along it when moved by hand and remains motionless if not touched.
Step 5: Taking Microphotos


Above are several photographs taken using this microscope. You can see how the microscope magnifies different objects.
See how part of the memory core from the old CDC-6600 computer looks when zoomed in.
The left photo shows the board itself, and the right photo shows a close-up of the toroids and wire mesh that make up the memory cells.
Since the camera has a resolution of 2 megapixels, it has quite good quality images. The ZEISS camera lens has an electromechanical body and, through software, adapts to the focal length that you and I have created for it.
A microscope is needed not only for studying the surrounding world and objects, although this is so interesting! Sometimes this is just a necessary thing that will make it easier to repair equipment, help make neat solders, and avoid mistakes in fastening miniature parts and their exact location. But it is not necessary to purchase an expensive unit. There are great alternatives. What can you make a microscope from at home?
Microscope from a camera
One of the simplest and most affordable ways, but with everything you need. You will need a camera with a 400 mm, 17 mm lens. There is no need to disassemble or remove anything, the camera will remain working.

We make a microscope from a camera with our own hands:
- We connect a 400 mm and a 17 mm lens.
- We bring a flashlight to the lens and turn it on.
- We apply a drug, substance or other microobject of study to the glass.


We focus and photograph the object under study in an enlarged state. The photo from such a homemade microscope turns out to be quite clear; the device can enlarge hair or fur, or onion scales. More suitable for entertainment.


Microscope from a mobile phone
The second simplified method for making an alternative microscope. You need any phone with a camera, preferably one without auto focus. Additionally, you will need a lens from a small laser pointer. It is usually small, rarely exceeding 6 mm. It is important not to scratch.

We fix the removed lens on the camera eye with the convex side outward. We press it with tweezers, straighten it, you can make a frame around the edges from a piece of foil. It will hold a small piece of glass. We point the camera with the lens at the object and look at the phone screen. You can simply observe or take an electronic photograph.

If you don’t currently have a laser pointer at hand, you can use the same method to use a sight from a children’s toy with a laser beam; you just need the glass itself.


Microscope from a webcam
Detailed instructions for making a USB microscope from a webcam. You can use the simplest and oldest model, but this will affect the image quality.

Additionally, you need optics from a sight from a children's weapon or other similar toy, a tube for the sleeve and other small items at hand. For backlighting, LEDs taken from the old laptop matrix will be used.

Making a microscope from a webcam with your own hands:
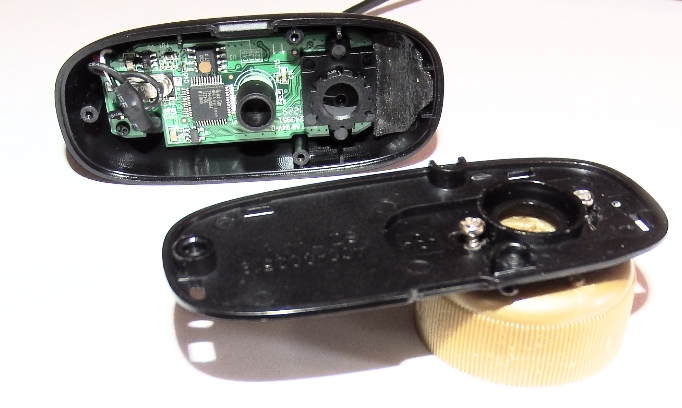
- Preparation. We disassemble the camera, leaving the pixel matrix. We remove the optics. Instead, we fix a bronze bushing in this place. It should match the size of the new optics; it can be turned from a tube on a lathe.
- The new optics from the sight must be secured in the manufactured sleeve. To do this, we drill two holes approximately 1.5 mm each and immediately make threads on them.
- We stick in the bolts, which should follow the threads and match in size. Thanks to screwing, you can adjust the focus distance. For convenience, you can put beads or balls on the bolts.
- Backlight. We use fiberglass. It's better to take double-sided. We make a ring of the appropriate size.
- For LEDs and resistors you need to cut small tracks. We solder it.
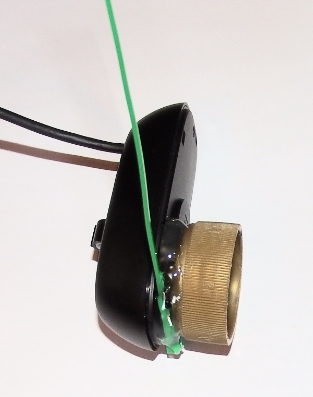
- We install the backlight. To fix, you need a threaded nut, the size is inside manufactured ring. Solder.
- We provide food. To do this, from the wire that will connect the former camera and the computer, we bring out two wires +5V and -5V. After which the optical part can be considered ready.

You can do more in a simple way and make an autonomous light from a gas lighter with a flashlight. But when it all works from different sources, the result is a cluttered structure.


To improve your home microscope, you can build a moving mechanism. An old floppy drive will work just fine for this. This is a once used device for floppy disks. You need to disassemble it, remove the device that moved the read head.

If desired, we make a special work table from plastic, plexiglass or other available material. A tripod with a mount will be useful, which will facilitate the use of a homemade device. Here you can turn on your imagination.

There are also other instructions and diagrams on how to make a microscope. But most often the above methods are used. They may vary only slightly depending on the presence or absence of key parts. But, the need for invention is cunning, you can always come up with something of your own and show off your originality.

DIY microscope photo


I always loved biology, but I never had a microscope, and so I decided to get one in order to admire the microcosm with the younger generation, and perhaps photograph the main chip of the 3DO console in the meantime.
It didn’t take long to choose the optical device itself; the choice fell on the Altami 104 microscope, this is a domestic microscope, my model with 2000x magnification (optics doesn’t provide more, no matter what they write there - it’s digital bullshit). Its price is very low, it cost me 12,800 rubles (May 2015). I don’t know how the imported analogs compare to it, but I’m happy as an elephant =) I doubt that it’s possible to make the device any better for the money. I ordered from the manufacturer, because it’s faster and cheaper and probably more reliable: http://www.altami.ru.
Microscope Altami 104
For those who also have not found how to adjust the light field of the microscope, I suggest: remove the eyepiece (if you were in a hurry to attach it), set the aperture to minimum and adjust the capacitor with the adjusting bolts so that the spot is in the center, then do not touch these screws again.

Spot by which to adjust
Of course, looking through a microscope (especially a monocular one) is difficult and you want to display everything directly on the monitor. However, the camera for the microscope is comparable to the price of the microscope itself. And I decided not to take it yet, but to try to make it myself. Which I will now tell you about in all details =)
In addition to the microscope, you will need a webcam, preferably with a good matrix, I used a Logitech C270 (at one time I bought several for 700 rubles, a special camera for a microscope with the same resolution costs 9000 rubles). It is very convenient because the focus of this camera is adjusted mechanically, although this is probably also possible in others - I just haven’t taken it apart, I don’t know.

Logitech C270 webcam
You will also need a screwdriver, a plug from plastic bottle, a couple of small screws (five millimeters long), and it is also advisable to have a glue gun on hand (Glue Gun), a couple of zip ties and a drill similar to those used by dentists =) So let's get started!
First of all, you need to reduce the weight of the camera, so you need to remove the mounting part of the camera. We pull out the decorative end caps from the rotating mechanism and unscrew the screw, then we squeeze out the shaft and the camera becomes like a feather.

Disassembly of the fastening mechanism
Next, you need to remove the front panel of the camera to get to the focus adjustment. To do this, you need to pull off the decorative panel, and then unscrew a couple of screws and remove the main plastic panel, behind which there is a simple filling.

Opening the camera
Now we need an attachment for the eyepiece, and its role will be played by an ordinary cap from a plastic bottle! It fits perfectly in diameter and has a stop inside so that it does not press close to the optics - you can’t imagine anything better, you just need to cut the thread and drill a hole with a radius of 3 plus or minus millimeters. For this I used a drill with a flexible connection, and used a small drill as an attachment. If you don’t have this on your household, take a regular knife and carefully cut off the thread, and make a hole with a regular drill, or dig out something else. The pieces of plastic can be scorched with fire to prevent them from dangling, then you need to level the top of the cork, for example with a stone.

Preparing the cork
Place the finished plug on the eyepiece and lean the camera with the main panel on, if necessary, adjust the focus (slowly, little by little, as accurately as possible). Also, cover the LED in the camera, for example, with electrical tape, so that it does not shine where it is not needed.
Next, you need to screw the main panel of the camera to the cork, for this I used screws, you can probably put it on with glue, but you need to accurately align the camera, so it’s preferable to set the screws first, maybe not the first time. Try it on, perhaps adjust it relative to the first screw and only then fix it with the second one. If the inclination is not optimal, insert spacers from pieces of plastic or something you have on hand. Then perform a general fitting.
Attaching the panel to the plug
Now all that remains is to fix the result; for this you can use a glue gun. Here I recommend gluing a tie or another flexible piece of plastic as clamps, this is necessary in order to fix the eyepiece so that your image does not rotate, following the webcam wire, you can even have several of these ties, or whatever you think of. Spread glue around it and let it harden.
Ready digital attachment
Now let's install all this on the microscope eyepiece, tighten the clamp to the eyepiece tube with a tie and enjoy the microcosm! The whole process takes no more than an hour; it took me longer to write the article.

Microscope assembly
In general, I must say that a special attachment is preferable, since it does not try to adapt to the lighting, which, with some microscope operating parameters, leads to auto-adjusting bounce in the image, perhaps this is adjusted in web cameras, I have not figured it out yet. And everything is calibrated exactly on the factory attachments, without any screws. But nevertheless, for amateurs the result is very good, although the preparation was made hastily on old glass with dirty hands- that’s why there’s so much garbage in the picture =)

Some kind of bacteria on onion cells
As a Windows 7 user, an unpleasant surprise awaited me after XP - in 7 they removed webcams from “my computer”, i.e. There are no standard tools to look at the result, so I had to program it =) Unpack it to any place and run the executable.
How to make a simple Leeuwenhoek microscope
First, we will learn how to make small lenses - glass balls with a diameter of 1.5 - 3 mm.Take a glass tube at least 15 - 20 cm long and 4 - 6 mm in diameter. Heat it in the middle over a fire until the glass softens, remembering to turn it around its axis all the time. Feeling that the tube has become plastic in the middle, sharply move its two ends apart. You will end up with two tubes with thin, long tips at one end.
Heat the tip over the flame of an alcohol lamp or gas burner so that surface tension forces form a glass ball at its end.
Place the glass ball into the recess using tweezers. Place the second plate on top and tighten them together using screws and nuts. (We specially made a collapsible design in order to experiment with balls of different diameters). The heads of the screws should be on the side of the protrusion of the viewing hole, because when viewing the microscope touches the skin of the face.
Now, using adhesive tape (tape), attach the cover glass from the school microscope along the contour to the copper plate opposite the viewing hole. (If you don't have one, a clear plastic piece cut from a plastic bottle will work).
Place the object you want to view through the microscope opposite the viewing hole and cover it with a second cover slip. But you see in the photo that the object of observation is a simple thread.
The microscope needs to be brought to the eye itself and look through it at some light source. This could be a window on a bright sunny day or a table lamp. After this, an amazing microworld will open to you. A thread, for example, will look like a huge rope with broken cables sticking out. The leg of a common fly will most likely resemble the leg of an elephant, heavily covered with bristles.
It is no less interesting to consider different liquids. If we consider it highly diluted in water watercolor paint, you can see the famous Brownian motion of paint particles in water. The milk will appear before you in the form of huge floating islands of fat droplets. Water from a nearby puddle hides an invisible world of microorganisms that do not even suspect that you are closely watching them.
Frog blood looks absolutely stunning when viewed under a microscope.
It has long been known that simple trinkets made by a parent with his own hands for his child are valued much higher by him than clever purchased gifts. At the same time, the authority of the elder in the eyes of the youngster increases noticeably. We present one of these man-made “little things” to the reader’s attention here. We will talk about a simple optical device from the “breed” of microscopes. The ability to magnify the latter far exceeds the capabilities of the strongest magnifying glass; a microscope will allow a child to see a lot of interesting things, examining, for example, insects and plants, and will help an adult, if necessary, evaluate the quality of sharpening of a cutting tool.
Homemade microscope from optics from an old camera
IN homemade microscope two ready-made optical units were used- standard lenses: from a small-format camera (such as FED, Zenit) to an eight-millimeter film camera. It is quite possible to obtain film optics, since thousands of amateur film cameras have become dead weight after the mass distribution of electronic video equipment.
So, how can you make a microscope from a camera?
For our microscope, we took a “Zonnar” lens (from a German camera) with a focal length of 10 mm, which was assigned the role of the microscope eyepiece. The Industar-50 lens from the old FED was suitable as a homemade lens. You also needed an extension ring No. 4 with an M39x1 connecting thread (the longest), used for macro photography. If you use a Zenit lens, you will need ring No. 3 with an M42x1 thread. Photo and cinema lenses are combined into a single optical whole using a rigid, light-proof tube. The extension ring will serve as a link between the lens, tube and stand. To pair a miniature cinema lens with the rear end of the tube, the upper conical part (along with the neck) of a suitable plastic bottle of drinks or perfumes is suitable.
Our assembled optical device is shown in the figure. The stand is made of thin boards or multilayer plywood 6...10 mm thick. An aluminum strip up to 50 mm wide and 1...1.5 mm thick is suitable for the bracket. You can make a bracket from a pair of PCB plates, connecting them to each other and to the stand with aluminum corners. It is advisable to give the bracket a shape that provides the optical unit with a convenient tilt for “work.” The tube, glued from cardboard, is fixed to the body of the extension ring with glue. The length of the tube depends on the size and shape of the neck of the plastic bottle (in this case, the neck should be cut so that its cylindrical part is at least 20 mm long, which will ensure the alignment of the optical units when docking). In the neck of the neck we will attach a film lens, for example, from a simple “Sports” film camera (of any modification).
Focusing of the optical system on the object of observation is carried out using a remote ring of the photo lens. It is better to make the tube composite (from separate sections that fit into each other with slight friction), which will expand the focusing range. It is advisable to coat the internal surfaces of the tube and neck with matte black paint. If you equip the device with a table for supporting a glass slide and a mirror, it will be possible to examine objects in transmitted light.