Everyone accumulates a certain amount of outdated things that they would like to throw away. But do not rush into this. This material can be used for a large number various handicrafts.
The most useful and sought-after option is a rug made from shreds of fabric, which can be used for various purposes. In order to make it, there is no need for great efforts, but the result will impress and please.
 There are many options for various rugs from old unnecessary things, no less number and methods to bring the whole theory into reality. All this can be found in books on needlework or on the Internet, or you can show your own imagination, creating another masterpiece.
Here we consider the main and most popular options for weaving carpets from things that have lost their need in their original form. So:
- Soft voluminous rug, which is based on shreds.
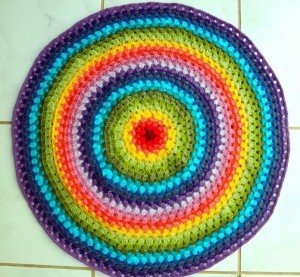
- Grandmother's rug, woven with a hook.
- A mat made of braids, the basis of weaving of which is the execution of a standard braid.
- Braided version, performed using a regular hula hoop.
The choice of species for your own creation can only be made based on your own preferences and skills.
Necessary tools and materials
Each technique requires specific tools. It can be knitting needles, and a hook, and very thick cardboard, and so on. Scissors are the tool that should always be present. It is important that they are of high quality and sharp, as this will greatly facilitate the work.
When choosing a material, you should follow a few rules:
- The width of the strips of fabric used to weave one carpet can be different, it all depends on the desired result.
- It is desirable that the mass of the fabric be approximately the same. With significant differences, this can be compensated for by the size of the bands.
- You should not combine cotton with wool in one carpet, as this will not lead to a decent result. Too different structure.
- It is most convenient to weave rugs from knitwear.
Basic manufacturing technologies
On the Internet, you can see a huge number of products, which ultimately complicates the choice. In order to simplify the search, it is worth dividing all products according to the main manufacturing methods:
- Sewing. The simplest method, but when using it, you need additional tools, such as a sewing machine. With the help of such a very ordinary home device, you can produce a very beautiful and high-quality rug in a short period of time.
- Weaving. It will require perseverance, time and patience. But the result is amazing. To bring it to reality, you need the simplest loom.
- crochet. Knitting needles for weaving such products are generally not used, since they cannot afford such a load. But the hook is ideal, because the structure is solid and strong.
- Knitting on a special warp. Rugs knitted using this technique will look perfect in any interior, as the result is soft and aesthetically pleasing. For this option, you will need to purchase a special base, but it is worth noting that it is inexpensive.
You can visually see the process of work in the following video:
Step-by-step instructions for various techniques
In order to create a beautiful rug that guests will not be ashamed to show, it is necessary to follow the instructions corresponding to each of the execution methods exactly.
Soft voluminous rug
To make a product that is great for a child's room, you must first prepare the following materials and tools:
- Small patches cut from old clothes.
- Scissors.
- Special rubber mat with ordered holes.
- Hook or small tweezers.
Step by step production:
- The prepared fabric is cut into strips with the same width and small length.
- Using a hook (tweezers), the strips must be inserted into the holes.
- Tie them with a simple single knot.
- In the same way, close all existing holes with fabric strips.
Everything is very simple and fast! 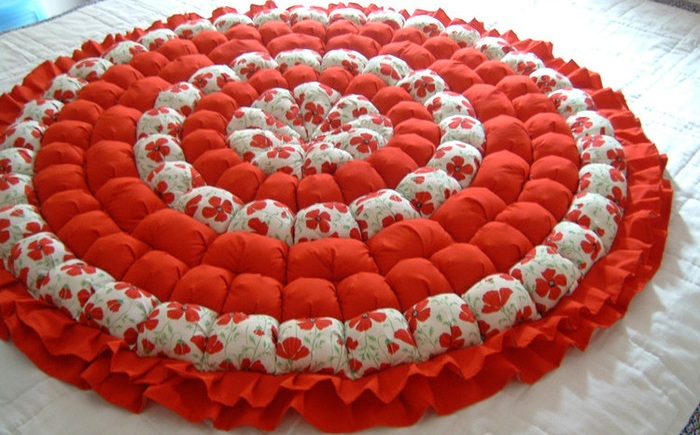
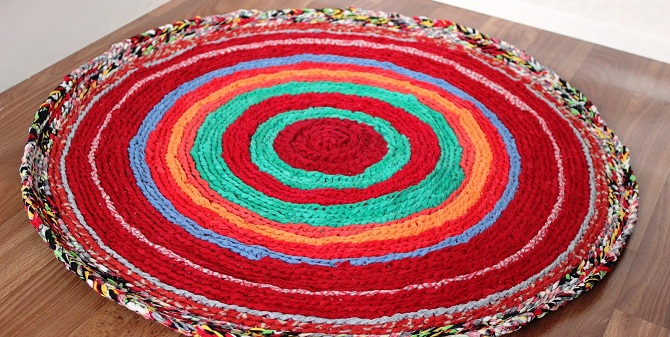
"Grandma's Rug"
This option is more popular than others. It can be found in many village houses. But many people want to give city apartments a little zest and real comfort. Such a product can be made without the help of a grandmother. This will require:
- Hook for knitting in the amount of 7 to 10 mm.
- Scissors.
- Waste fabric in various colors.
Manufacturing:
- The fabric is cut into thin strips. At the same time, efforts are optional, since evenness does not play a special role. Due to some irregularities in the cuts, the rug will acquire a kind of volume.
- The strips are connected alternately into one continuous rope. The sequence of colors depends on the idea of the future product. The tying takes place with the usual double knot, which is pulled as tight as possible in order to make it easier to hide.
- At the end point of the finished rope, a small loop is made, and five loops are knitted from it in the form of a chain. The very last loop must be connected to the very first. This is how the initial row is formed.
- The second row is done a little differently. A convex loop remains from the first row, into which the working tool is inserted and then also captures the one closest to it in a counterclockwise direction.
- So there are two loops on the hook, to which the free thread is also captured with the help of the hook. The thread must be pulled through these loops. This creates the next loop.
- According to the same pattern, the entire row is knitted to the very end.
- This scheme from the very beginning should be repeated until the completion of the manufacture of the entire rug.
There are several options for connecting threads:
- Circular the connection is made as needed to introduce a certain color. The result should be a product with multi-colored even circles.
- Sequential is performed with a preliminary fastening of a homogeneous knitting thread. Each type of fabric is fastened in the sequence conceived by the manufacturer. The result is a rug with a constantly repeating pattern.
- Chaotic the connection occurs with the introduction of various tissues at random. The result is a bright product with absolutely illegible rows of knitting.
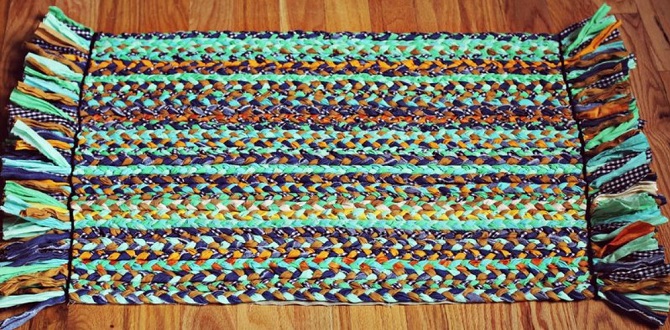
Braid rug
If it is impossible to use such a knitting tool as a hook, you can use a simpler way to make a patchwork product. This will require:
- Fabric in three colors.
- Needle and thread or glue.
Work progress:
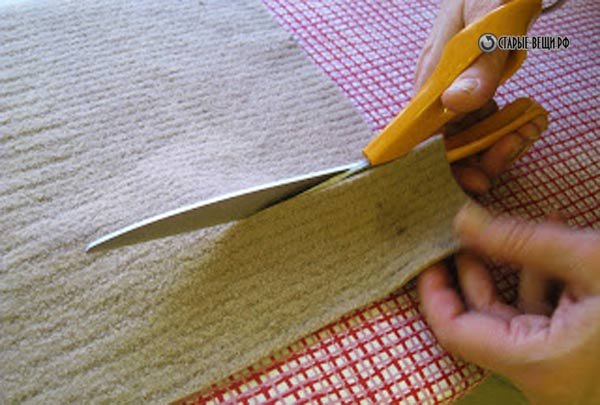
- The fabric is neatly cut into strips of the same size.
- Stripes of three colors are woven into a standard braid.
- Braids between themselves must be glued or sewn.
- A continuous long braid is folded in a circular direction. Here the braid should also be fastened with a needle and thread. For these purposes, you can also use glue.
Wicker rug
A rather original way of weaving is the manufacture of products using a hula hoop. This technique is quite simple. First you need to prepare some elements that will be needed in the process of work:
- Hula Hup.
- Many multi-colored thin strips of fabric.
- Scissors.
Weaving technology is impossibly simple:
- First of all, with the help of stripes, a kind of web is made on the hoop.
- Next, the strips are threaded into this web in the center of the circle with a snake.
- When one of the strips goes through a full circle, you need to tie it in a neat knot.
- All other rows are performed in the same way, gradually rising to the edges of the hoop.
You can create a beautiful rug using various methods and a wide variety of hand tools.
In contact with
Today we will tell you how you can make-sew a patchwork rug with your own hands without the help of a hook. This master class will appeal to caring mothers who are trying to surround their baby with care and attention from all sides.
Tools and materials Time: 5 hours Difficulty: 6/10
- multi-colored shreds of fabric of any texture and color scheme;
- insulation - any;
- pins;
- thick paper;
- thick thread;
- pencil.
Agree, it’s much more pleasant when a child crawls on a rug sewn with my own hands! And such a product will practically not require material costs, the main thing is to approach the task wisely.
Step by step master class
Well, we call for help from relatives (we cannot do without them in our business - someone should take care of the child) - and for the cause!
Step 1: material selection
shreds
A children's rug should be bright, warm and soft at the same time. We want your baby to be comfortable, interesting, and pleasant to crawl on it.
Therefore, for work you will need several types of fabric in contrasting colors and with a variety of patterns. In the master class, we will opt for pink colors - we will sew a rug for a girl. Boys can pick up shreds of other colors.
Since this is a rug for a nursery, it is better to alternate bright colors with calm ones. It is advisable to choose shreds with a large pattern - the baby will be interested in looking at it
![]()
insulation
The rug is an active participant in the life of the baby, so stains will appear on it from time to time and it will have to be washed. So you need to choose a heater that tolerates numerous washings well. For example, synthetic winterizer. And even better - a modern filler Slimtex.
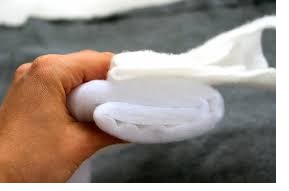
The peculiarity of this material is its hygroscopicity and hypoallergenicity, small thickness and high thermal insulation, flexibility, elasticity and durability.
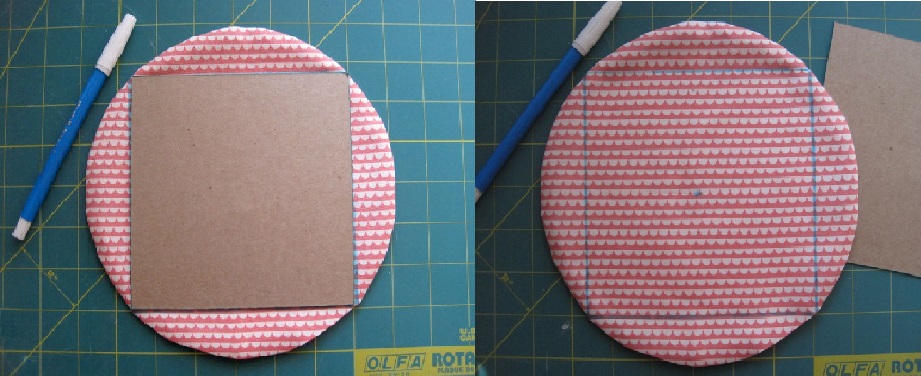
Step 2: Pattern
The dimensions of the rug can be any - at your discretion - vary them depending on the room and your idea. In our example, the rug consists of 20 round pieces with a diameter of 20 cm.
To make a template for a round paper part, we need a large plate or a homemade compass, which is made from a thick thread, a pencil and a pin (see the picture below).
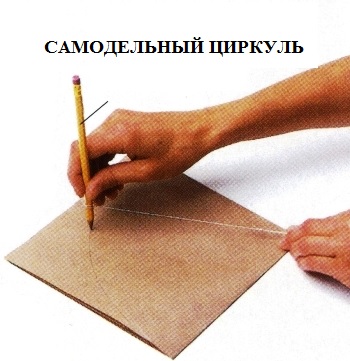
Take a sheet of paper and fold it in four. At one end of the thread we tie a knot, from it we measure a segment of the desired length, equal to half the diameter of our part. We pin a knot to the top of the folded corner with a pin, tie the other end of the thread to a pencil, draw an arc over the entire sheet of paper. Cut out and lay out the resulting round pattern. Don't throw away the template, we'll need it later (see Step 5)!
Step 3: cut details
We pin the pattern to the scraps of fabric and cut out the blanks - a total of 40 parts.
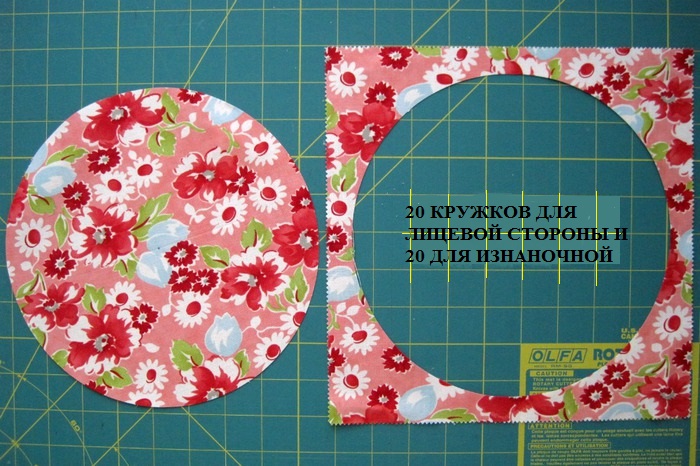
In the same way, we cut 20 parts from insulation.
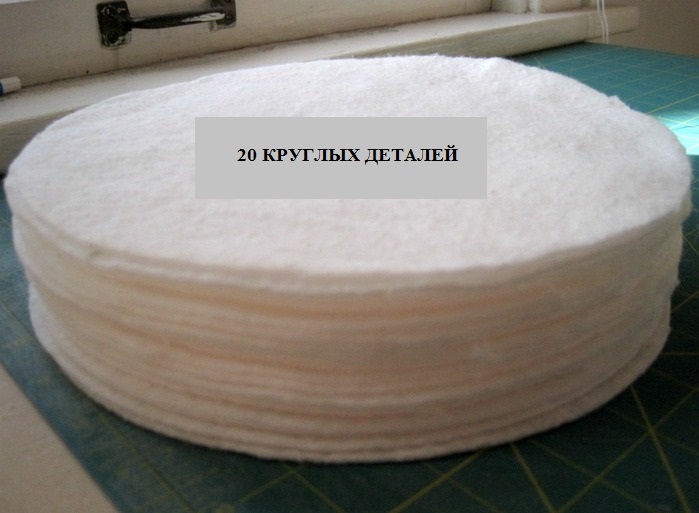
Step 4: sew 20 round parts
First you need to fold the parts with a “sandwich”: a heater, a fabric blank on it face up, a blank face down.

We chop them off with pins so that they do not fall apart during stitching and lay a seam at a distance of 0.5 cm from the edge. We fix the beginning and end of the seam.
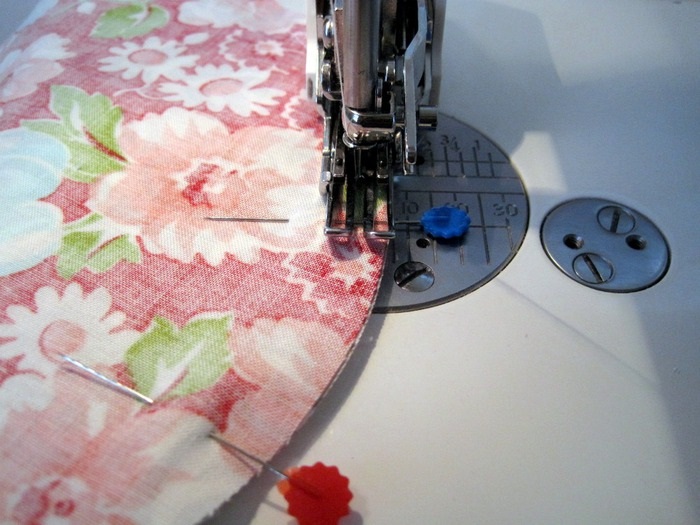
We cut the seam allowances around the circumference - so that the part does not bulge when we turn it inside out. Make a wide cut with scissors.
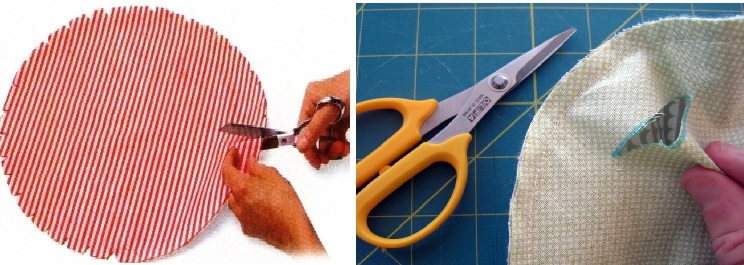
Carefully turn the part through the incision so that the edges remain as rounded as possible. We iron with a hot iron.
So we repeat with every detail. In total, 20 pieces should be obtained (this is in our case - but their number can be varied).
Step 5: Putting the Details into a Composition
We apply the markup
A square cut out of paper will help us with this. On the template of a round part (we hope you didn’t throw it away), we draw perpendicular lines through the center. We connect the vertices - we get a square, cut it out.
![]()
We apply a square, circle it with a pencil. Marking is applied to every detail.
Sew the details
We fold the two parts with the sides with a cut inward. We sew according to the markup.
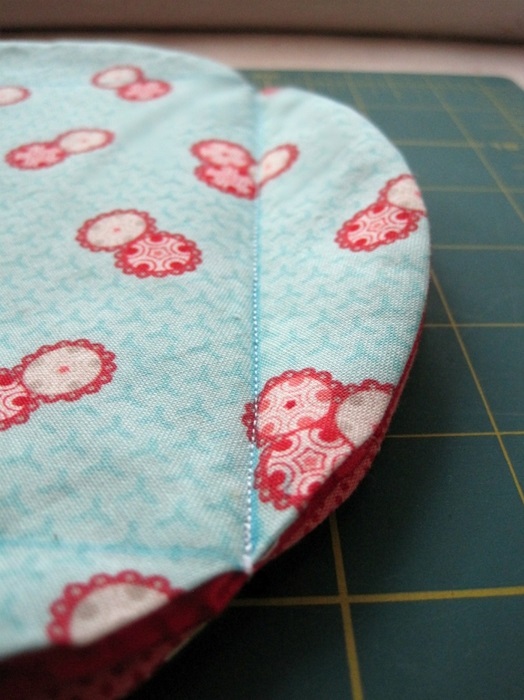
In the same way we connect 4 circles in a row. These are the “petals” sticking up should turn out. Then again we apply the parts to each other, we cut them off with pins so that they do not fall apart.
We sew the details according to the markup without interrupting the seam. At the same time, we lay the seam along the “petals” laid out horizontally.


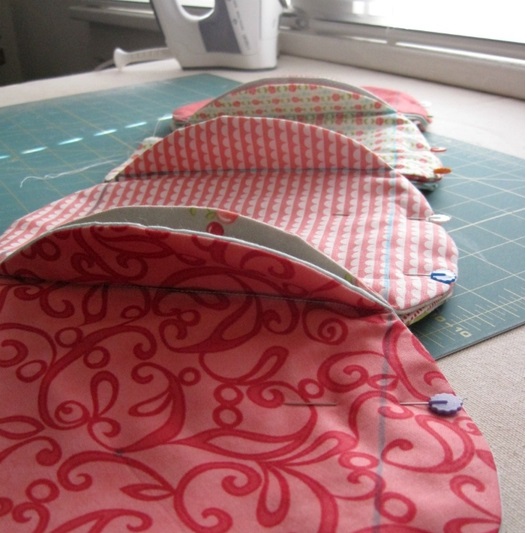
We continue in the same spirit until we sew all the details together: in length - 5 details, in width - 4 details.
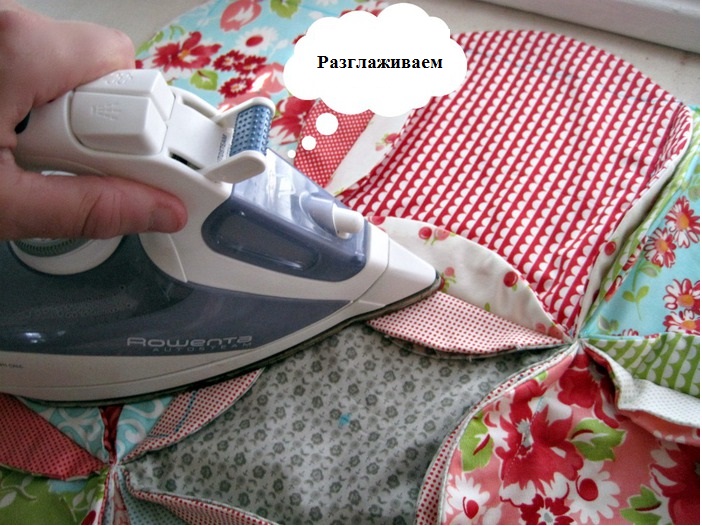
Smoothing out the seams
With a hot iron with the steam function turned on, we smooth out the “petals”. We carry out this operation as carefully as possible, since it depends on how even our rug will be.
Step 6: Sew the Petals
Sew each "petal" to the base. We try to avoid wrinkles in the fabric.
Twisted threads. Carpet for the house. Master classes
Rope rug. Master Class
Hi all!
Good housewives clean up unnecessary stocks of clothes, textiles, etc. usually twice a year - at the end of summer and at the end of winter. The necessary is erased, dry-cleaned and sent to the far shelf, the unnecessary is disposed of. And if everything is clear with the first moment, then with the second there are some fears that everything unnecessary will also be packed "just in case" and increase or create home clutter. But oh, how she doesn’t like space :) As mine shows personal experience, such blockages are rarely sorted out, for some reason they tend to only increase :) The most interesting thing is that this happens more often in the house of needlewomen, because it is they who know how to use obsolete clothes and textiles, one thing is bad - they are in no hurry to do this :)
I want to suggest you do it a little differently this year :) Before preparing for the autumn season, we will make a list of what exactly we will use unnecessary fabrics for, and when it comes to sorting clothes and textiles, we will lay out our fabrics separately, according to the goals and tasks :) And - most importantly - we will determine the time for processing and disposal! And if we didn’t have time, forgot, overdue, we’ll just throw it away. Let's talk about the results, okay?
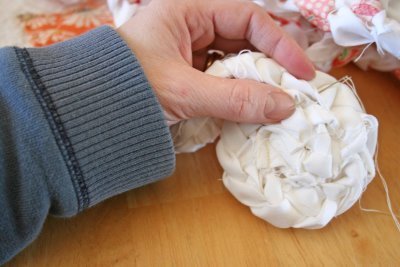
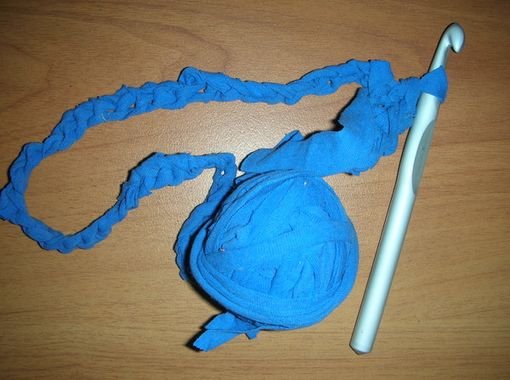
In the meantime, I want to offer you a universal option for dealing with fabric blockages - this is the creation of twisted threads. They can be knitted, used as a rope-cord for various purposes, or you can make a rug, for example :) The author of the idea and master classes is the craftswoman Cynthia (mypoppet.com.au). Happy viewing!
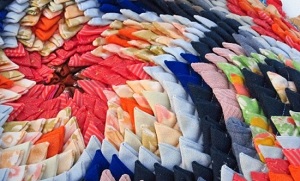
Unusual rugs knitted from shreds served as a decoration for the house of our grandmothers and great-grandmothers. This type of weaving was passed from mothers to daughters, each craftswoman tried to add her own touch of individuality to each product, so the rugs turned out to be bright and beautiful. Let's pay tribute to history and also weave such a rug with our own hands. We will tell and show how to weave a patchwork rug without a hook.
There are several varieties of weaving patchwork rugs with your own hands. But before starting work, each needlewoman should decide what size of rug she wants to see, as well as its color scheme and design. Wicker rugs, consisting of braids, are made very simply. A voluminous look is achieved by partially attaching fabric flaps to the base, while the loose ends create a curvaceous look. The rug can also have a rectangular appearance, not just round or oval.

Weaving a patchwork rug without a hook
Required materials and tools:
- patchwork fabric
- Thread, needle
- pins
The weaving of the rug will be carried out using a spirally twisted pigtail made of 3 pieces of fabric of different colors. The stiffness of the rug will be determined by how tightly the braid is woven. The more it is woven, the harder the rug will be.

Before we start weaving, we will cut the tape of the required width. But we are faced with the question of how to weave if the flap is over, and the knots are not imposed. The answer is quite simple, cuts should be made at the ends of both ribbons and cut to match the others, forming a loop. After that, the braid will turn out to be of sufficient length. In the center of the weave, we also easily and accurately lay the tape in a spiral, intercepting it with a thread in 2 parts to the desired diameter. Here is our rug and ready! Also, a patchwork rug can not be sewn, but intercepted with another tape.
Other techniques are also used for weaving. Some of them will be described below.
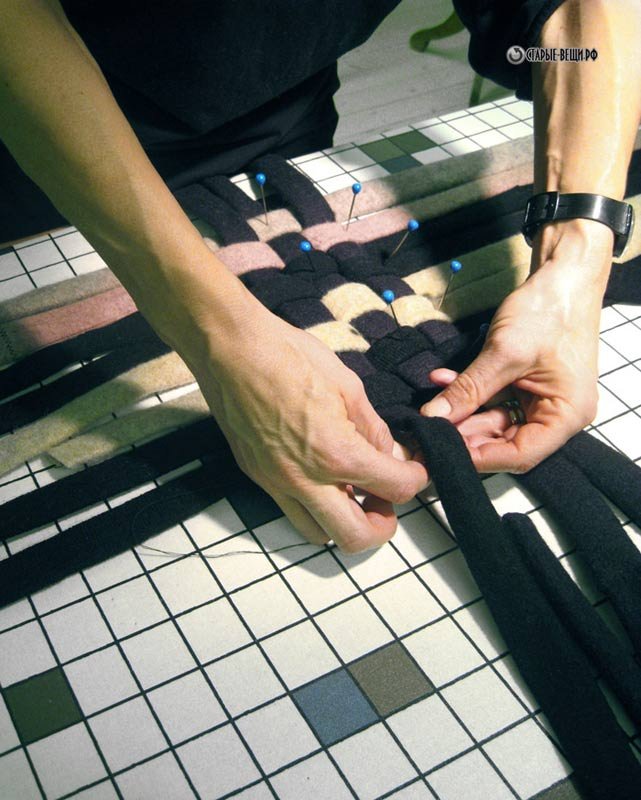
"Spider line"
Another way of weaving is a cobweb. To do this, we will connect approximately 8-12 ribbons in the form of a snowflake. We fix them on a round cardboard base, then starting from the center, weave them in a circle between the warp threads of ribbons and stripes. They need to be firmly pressed against each other. Next, weave the pigtails until we get a rug. Along the edge it can be fastened with a finishing strip.
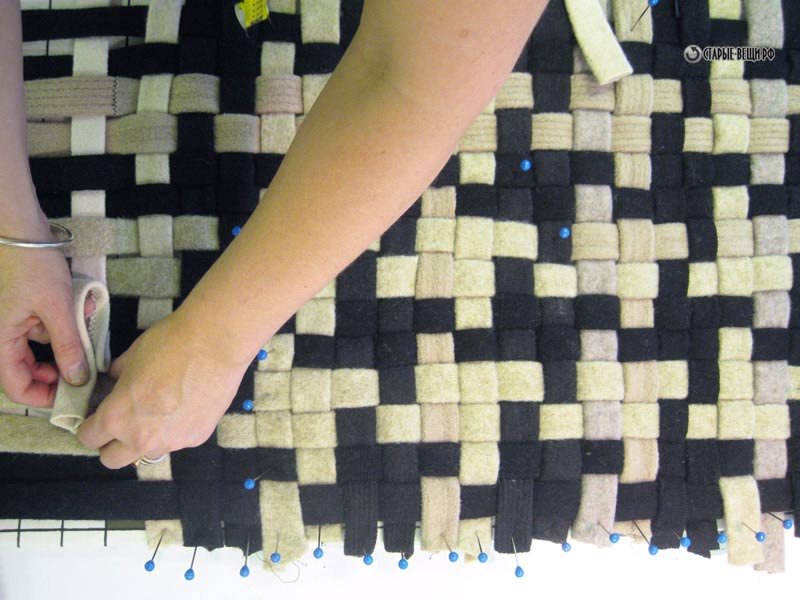
"Chess"
Chess is the same way of weaving rugs. Strips of fabric are intertwined in a checkerboard pattern, not in a circle. To create such a rug, it is best to use a dense fabric.
- If you are concerned that the rug will shrink after the first wash, take the following steps. If the shreds are made of new material, then they can be washed and steamed, then, if the fabric immediately settles, you can start weaving the doormat without any doubts and fears.
- Scraps from different things before weaving should be starched and steamed.
- To create products subject to stress, the flaps must first be placed on a lining with synthetic winterizer.
- To make all elements the same, use ready-made cardboard templates to create. Then the quality of work will be at a high level.
- Do not throw away your old things, it is better to make a beautiful and original doormat for your home with your own hands. In the house, it will look unusual and stylish. In addition, hand-made things are now at the height of fashion.
Related videos
Undoubtedly, weaving patchwork rugs without using a hook is an interesting and exciting activity. What other types of rugs can be woven, what colors to use, you will learn in our special selection of videos on this topic. Happy introduction!
Each needlewoman, for sure, has old things, shreds of fabric or yarn, and wonderful rugs can be made from all these materials. This will be discussed in our today's article.
This article will present master classes that will help you figure out how you can make rugs from different materials and using different techniques, for example, using the thread pulling technique. The needlewomen will talk about how you can make a small rug from scraps of fabric, from things that you can’t wear anymore, but it’s a pity to throw it away, and they will also show you how to make pompoms from yarn, so that later you can make a rug out of them.
Option 1: from scraps of fabric
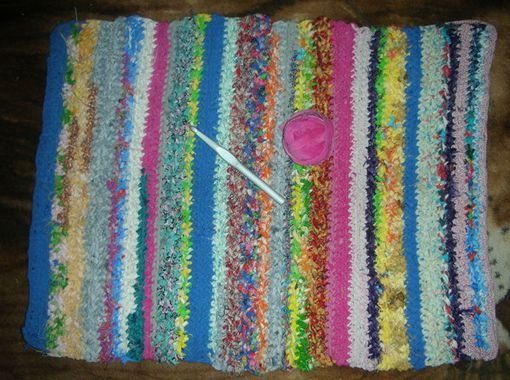
In order to make rugs from shreds, in addition to the fabric shreds themselves, you will need scissors and hook No. 10. First you need to make blanks, for this you should cut strips about four centimeters wide, then you need to wind a ball from each strip. Then, using a hook, you need to pick up air loops and continue to knit a row with single crochet columns, in all subsequent rows there should be as many loops as there are in the first initial row. After all the rows are knitted, all sides of the rug must be tied, for this you need to pick up a ball of bright color and perform single crochets. In order for the corners not to twist, you need to add three air loops.
There is another option for making a rug from fabric shreds, for this you need to cut strips of fabric of the same size, it is advisable to select shreds that are similar in color. Then you need to spread the mesh base and thread the prepared shreds, tying knots. The work is quite painstaking, but it will turn out to be a beautiful rug, for example, for a children's room.
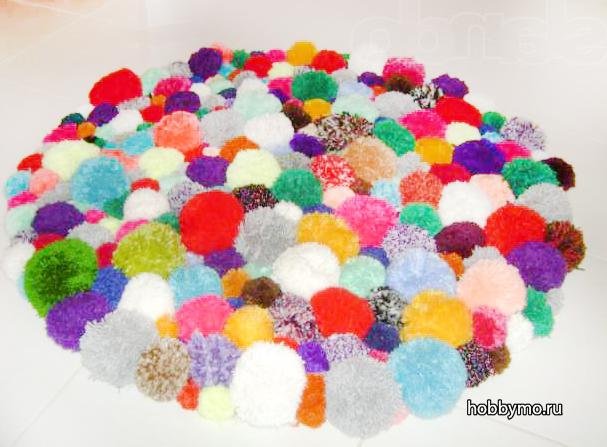
Option 2: from pom-poms
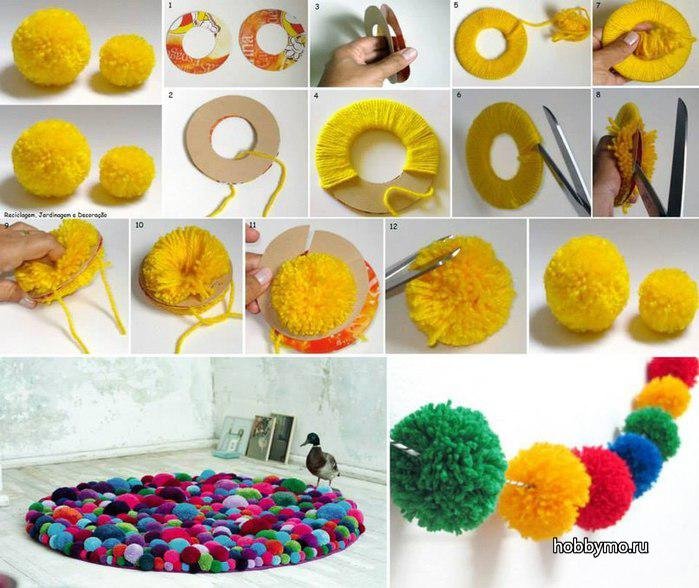
Utilitarian needlework makes it possible to make the necessary, practical things for the home on your own, using materials that every housewife will certainly have. For example, in order to make the atmosphere in the house more comfortable, a rug can be made from pompoms.
For work, you will need skeins of yarn, sheets of cardboard, fabric, thread with a needle and scissors. First of all, two identical circles must be cut out of cardboard, with a diameter of about fifteen centimeters, then holes should be made with a diameter of five centimeters. After this, the rings should be superimposed on each other and wound on them from two to four layers of thread tightly and evenly. Next, you need to cut the yarn between the cardboard boxes and do not cut the threads.
As a basis, it is worth using two pieces of fabric, which must be sewn and stuffed, for example, with cotton wool. Then, using a thread with a needle, you need to sew the pompoms onto the base.
Option 3: from any old things or rags
In order to make an original rug from old things, you will first need to look into the closet, get things out and choose those from which the rug will be made from shreds. Then, strips of five centimeters wide and the same in length should be cut from things. For convenience, you can apply the contours of the carpet on a sheet of paper. Then you can start laying the strips. First you need to lay out the strips horizontally, securing them with pins to the paper. Then you need to arrange the vertical stripes in a checkerboard pattern, i.e. threading the strip from below, then from above. After the rows are formed, it is desirable to sheathe the carpet for strength.